Lynn Lewis Photography | Big Sur Wedding + Elopement Photographer
  • Home
  • Work
  • Guides
    • Big Sur Elopements
    • Santa Cruz Elopements
    • California Redwoods Elopements
    • Northern California Elopements
    • Big Sur, Carmel, & Monterey Wedding Venues
    • San Francisco Elopements
    • Bay Area Redwood Wedding Venues
    • San Francisco City Hall Elopements
  • Blog
  • About
  • Pricing
  • Contact
Big Sur Elopement Guide
Big Sur, Carmel, & Monterey Venues
Santa Cruz Elopement Guide
California Redwoods Elopement Guide
Northern California Elopement Guide

DIY: Wide Mat Photo Frame

1/1/2017

1 Comment

 
Picture
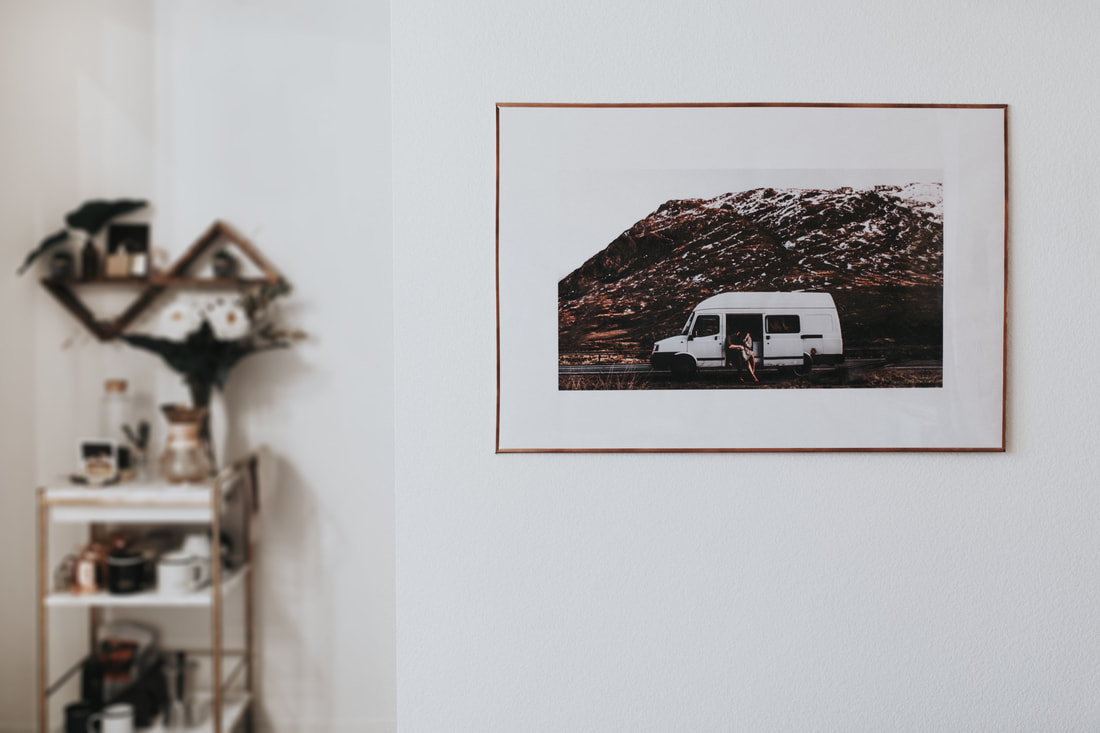
Does anyone else torture themselves by wandering through West Elm knowing that you'll never be able to justify spending that much on home decor yet still wanting everything in the store? I've always loved the look of a grand framed photo in our home, but didn't want to spend that much knowing how often my style changes. So instead, I DIY-ed a budget version that worked for my purpose! Maybe not the type of frame you'd want if you were looking to invest in something for years and years to come, but definitely a simple budget solution for those wanting that mid-century modern look.
MATERIALS:
  • Large Poster Frame ($20 from Michaels with 40% off coupon)
  • Spray Paint
  • Digital Image File
  • Adobe Photoshop or Mat Board

INSTRUCTIONS:
Creating the Faux Mat:
Below are instructions to create a faux mat by adding in a white border to the image file. Alternatively, you could use a large piece of mat board and mat cutter to cut the appropriate opening size.
  1. Determine how large of a border you want and subtract that from the frame size to determine the size of the image. For example, if you have a 27" x 40" frame and want a 5" border on all sides, then your image needs to be 17" x 20."
  2. Open Adobe Photoshop. Go to File > New. Fill out the dimensions with the width and height we just calculated above (17" x 20") at 300 pixels/inch resolution. Click OK, then paste the digital image onto the new file. Using the Move tool (first one with the arrow), click Control/Command + T to transform, and drag the image to the top left corner. Then hold down Shift to keep the proportions correct and drag the lower right corner simultaneously until the image fills the entire space. Click Enter to release the transform tool. Then click Control/Command + A to select all and Control/Command + C to copy the image.
  3. Go to File > New. Fill out the dimensions with the width and height of the frame (so in this case, 27" x 40") at 300 pixels/inch resolution. Make sure your Background Contents are white. Click OK, then click Control/Command + V to paste the image. Save the file as a JPEG, then send it for printing. I like to print larger prints through Staples as an engineering print, then trim the print to the correct size.
Creating the Frame
  1. ​Now for the frame, take out the clear sheet and backing until you have just the frame. Spray paint the frame with the color of your choice. Let the paint dry.
  2. You're pretty much done! Put the print into the frame and hang up on your wall.
1 Comment
Louise
5/23/2018 02:12:50 am

Wow. I totally just saw this on BuzzFeed and thought it would go great with my walls. Thank you for the detailed instructions! I'll try it on my own sometime this week 🙂

Reply

Your comment will be posted after it is approved.


Leave a Reply.

    All
    Couples
    Couples / Elopements
    Couples / Guides
    Couples / Proposals + Engagement + Anniversary
    Couples / Self Portraits
    Couples / Wedding
    DIY / Florals
    DIY / Home
    DIY / Photo Displays
    Portraits
    Portraits / Family
    Portraits / Maternity
    Portraits / Seniors
    Travel
    Travel / Bay Area

  • Home
  • Work
  • Guides
    • Big Sur Elopements
    • Santa Cruz Elopements
    • California Redwoods Elopements
    • Northern California Elopements
    • Big Sur, Carmel, & Monterey Wedding Venues
    • San Francisco Elopements
    • Bay Area Redwood Wedding Venues
    • San Francisco City Hall Elopements
  • Blog
  • About
  • Pricing
  • Contact

Picture

Big Sur Wedding and Elopement Photographer serving BIG SUR | Carmel-by-the-sea | CARMEL Valley | MONTEREY | SANTA CRUZ