Big Sur Elopement and Wedding Photographer | Lynn Lewis Photography
  • Home
  • Work
  • Guides
    • How to Plan a Big Sur Elopement
    • Top 10 Big Sur Wedding Venues
    • Carmel and Monterey Wedding Venues
    • How to Plan a Big Sur Proposal
  • Blog
  • About
  • Pricing
  • Contact
How to Plan a Big Sur Elopement
Top 10 Big Sur Wedding Venues
How to Plan a Big Sur Proposal

DIY: Geometric Diamonds

10/1/2016

0 Comments

 
Picture
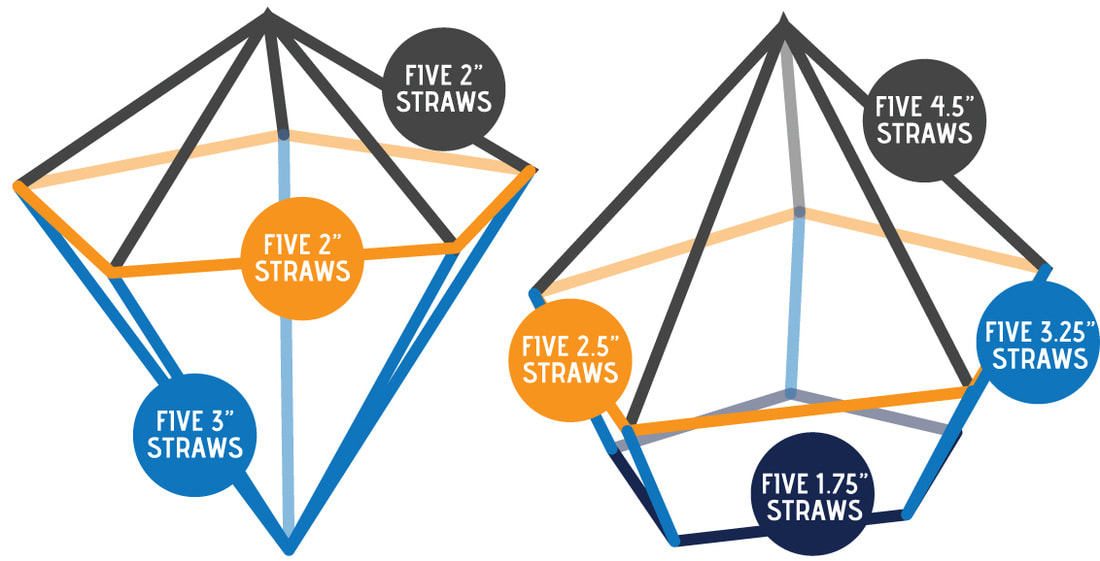
I bought my first succulent in one of these geometric diamonds - can you guess which one it was from the picture below? One is unlike the others...but oftentimes people can't tell the difference. The 3rd one from the left is made out of metal pipes but the rest are made out of...

Coffee straws! Who would've guessed right? Such a simple and cheap material turned into something that looks far more expensive! A little gold spray can do wonders.
Materials:
  • Coffee straws
  • Illusion wire ($4 at Michaels)
  • Gold spray paint (Krylon Metallic Gold for $7)
Picture
Instructions:
  1. Start by deciding what type of geometric shape you want to make. There are two different shapes - one without a base (left image) and one with a flat pentagonal base (right image). Personally, I prefer the traditional diamond shape - plus, it can be right side up or upside down. If you want to make the traditional diamond go to step 2. If you want to make the larger one with a base, go to step 3.
  2. For the diamond without a base, cut your straws into these lengths: ten 2" straws and five 3" straws. See diagram above.
  3. For the diamond with the flat pentagonal base, cut your straws into these lengths: five 4.5" straws, five 3.25" straws, five 2.5" straws, and five 1.75" straws. See diagram above.
  4. Cut your string. Depending on how long you want it to hang, adjust as needed, but you can always cut a string and tie it on to hang it later. To string the shape, cut at least 2.5x the length of all the straws combined (88" for the smaller one, 150" for the larger one), especially when stringing it for the first time. I ran into several problems when my string was too short, and had to cut another string and tie it to the end. Avoid this problem by cutting more than necessary the first time and adjusting it the second time.
  5. Start with either end of the diamond, and start stringing your shape. You can start from anywhere and go anywhere, as long as you connect the right length pieces together. I found that it was easier to just string as I went, creating the shape without certain steps. When I needed to go back to a certain corner, I simply strung the string back through multiple straws to get where I needed it to be.
  6. Once you have created your shape, spray paint the straws gold.
  7. Hang them up and enjoy! Create a variety of shapes and sizes for a beautiful display.
0 Comments

Your comment will be posted after it is approved.


Leave a Reply.

    All
    Couples
    Couples / Elopements
    Couples / Guides
    Couples / Proposals + Engagement + Anniversary
    Couples / Self Portraits
    Couples / Wedding
    DIY / Florals
    DIY / Home
    DIY / Photo Displays
    Portraits
    Portraits / Family
    Portraits / Maternity
    Portraits / Seniors
    Travel
    Travel / Bay Area

  • Home
  • Work
  • Guides
    • How to Plan a Big Sur Elopement
    • Top 10 Big Sur Wedding Venues
    • Carmel and Monterey Wedding Venues
    • How to Plan a Big Sur Proposal
  • Blog
  • About
  • Pricing
  • Contact

Picture

Big Sur Wedding and Elopement Photographer serving BIG SUR | Carmel-by-the-sea | CARMEL Valley | MONTEREY | SANTA CRUZ